
- Majel Barrett, wife of Gene Roddenberry
Making Jedi Costumes
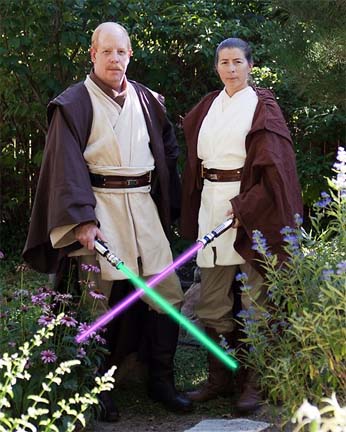
These were both a lot of fun AND a lot of work, probably more of the latter. I highly recommend doing a mock-up of everything made of old sheets from a thrift store, you can then make adjustments as needed before you cut the "real" stuff. All the final fabric pieces were serged after cutting. I also suggest the use of dress dummies for each of the costumes. I have cheesy-instructions on my blog on how to make one.
Jedi Undertunic
Used: Gauze fabric; interfacing & plastic snap closures.
I can't recommend a tutorial for this one, we didn't use one. The Husband sketched out the pattern based on our measurements.
Jedi Overtunic
Used: Gauze fabric; a cotton lining fabric; interfacing, plastic snap closures & cording for tie closures on the inside waist
Our overtunic was based on Taeliac's Fakimono Pattern. Here's where the sheet mock-ups come in handy - You'll need to adjust the pattern to account for the jedi tunic's waist seam where the "skirt" is sewn in. By using the mock-up you can adjust the pattern to suit the waistline of the tunic's wearer.
The skirt isn't too difficult either, you can find a good description on how to figure out the curves of the skirt at SithariRog's Tunic Tutorial.
Jedi Tabard
Used: Gauze fabric; lining fabric.
No tutorial used. We mocked up 8" wide piece of fabric for Him, 6" for Her, that went from his back-waistline over each shoulder and down to the front-waistline. The back tabard pieces are slightly angled - imagine "Y" being sliced down the middle, there's a subtle curve before the pieces go their separate ways over each shoulder. At the front waistline, the tabard pieces are each cut at an opposing angle to follow the waist and then an additional piece (the one that hangs straight down the front of the costume) is sewn on. I used a lining to give it more weight. This seam will be hidden behind the obi.
Jedi Obi
Used: Gauze; interfacing; velcro.
There's lots of discussion in the forums on the best way to make one of these, we decided on the Self-Scrunching Obi tutorial by Vera Campbell aka "Leia". It's neat and simple, gets the look your aiming for and you don't have extra layers of fabric and tie-strings as suggested in other tutorials.
I didn't follow her directions exactly. After cutting the bias piece I sewed all 3 pieces together, turned right side out then scrunched and ironed the folds. We used velcro closures. The tabard pieces are hand stitched to the obi to make it easier to dress yourself! We put the Obi velcro closure to one's right side in the back, then when the tabard pieces are sewn to the center back of the Obi AND the belt is fitted over all that, we didn't have uncomfortable lumps in the middle of our back. By moving the Obi's closure we were mitigating the problem of everything at our center-back.
Jedi Robes
Used: Linen
The very iconic robe. It looks so simple in its humbleness, but beware, its construction can feel like your wrestling with the dark side.
We used linen fabric found on sale at the fabric store and used this tutorial from the Jedi Assembly and written by Ani-Chay Pinn as a reference. I liked this tutorial over others because of the large clean drawings. I'm a picture person, so this one worked for me.
For His robe I used the larger suggested width for the front & back panels, 24". This turned out to be too large, but easily fixed later by reducing the neck of the robe by 8 inches with two folds centered at the nape of the neck (2" folded twice left and right side of neck). It gave the robe fullness at the bottom, but a more fitted look at the top - the folds are hidden by the hood. Also on the Front Panels I used 8" on His hem facing, and 6" on Hers.
All the major seams were machine stitched - so all the panels, and the sleeves where seemed to the body, however, the front panel hem facings, and the sleeve cuffs, as well as the collar casing were blind hem hand stitched. The hood was also hand seemed along the face and all machine seems seen inside the sleeves or the main hood seam were hidden with blind hem stitch and casings.
His robe took approximately 4 days due to all the handwork, Her robe (which was entirely machine stitched by my husband) took ~7.5 hours and was completed in one sitting, 8pm to 3:30am.
Light Sabers
The Husband made these. Have no clue how he did it, but I can confirm it took days and DAYS. Here's the forum he posted pictures to and answered questions about them.
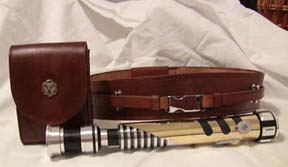
Belts & Pouches
Again, the Wonder-Husband made these. I'm not a leatherworker, but I know it involved lots of hand stitching thru the leather. The pouch was created over a mold that he carved, then wet the leather and burnished over the carvings. Other than that, I'm at a loss. You can contact him at his blog if you have questions.